


Blog by: ArtReach SD
As the winter months approach, many of us dive into DIY holiday crafts, seeking warmth and festivity with unique holiday decorations. This season, why not light up your spaces with handcrafted glow? We turned to OOLY’s Creatibles DIY Window Cling Art Kit to design our very own Holiday Candle Holders. More than just a holiday craft, this activity promises to infuse soft lighting and cozy vibes or serve as a heartfelt DIY holiday gift. Unleash your creativity by either using the stencils provided by OOLY or sketching a holiday drawing of your own!
Time Duration: 1 hour (up to 24 hours to dry)
Skill Level: Beginner-Intermediate
OOLY Products Needed:
Other Items Needed:

- FREE Penguin stencil
- Glass jar (approx 6 x 4 x 4 inches)
- Flameless candle
Step 1: Kickstart your holiday crafting by assembling everything you'll need. First, grab your Creatibles DIY Window Cling Art Kit. As you unpack, you'll find a vibrant range of 6 holiday colors of paint, 2 reusable transparent films perfect for any holiday design, one glue stick, and a collection of 14 traceable designs. Choose from the included designs or, if you’re up for an added challenge, download an exclusive penguin stencil (available here), print, and trim to a 4” x 6” size.

Step 2: Once you’ve chosen your DIY holiday design, take your glue stick and spread it on top of the paper, with the design facing up. Then, place one of your reusable transparent films on top.

Step 3: Now it’s time to create an outline. Grab the bottle of black outliner paint and trace your design on top of the plastic, as I’ve done here for my holiday penguin drawing. Leave this to dry for about 2 hours.

Step 4: When the outline dries, it’s time to dive back into our holiday coloring adventure. Grab the other 5 bottles of paint and get ready to get colorful! Fill in your design, and remember, it's all about capturing those holiday colors and festive vibes. Happy with the splash of colors? Great! Now, patience is key. Let it sit and dry for a full day – about 24 hours. Your holiday craft will thank you for it!


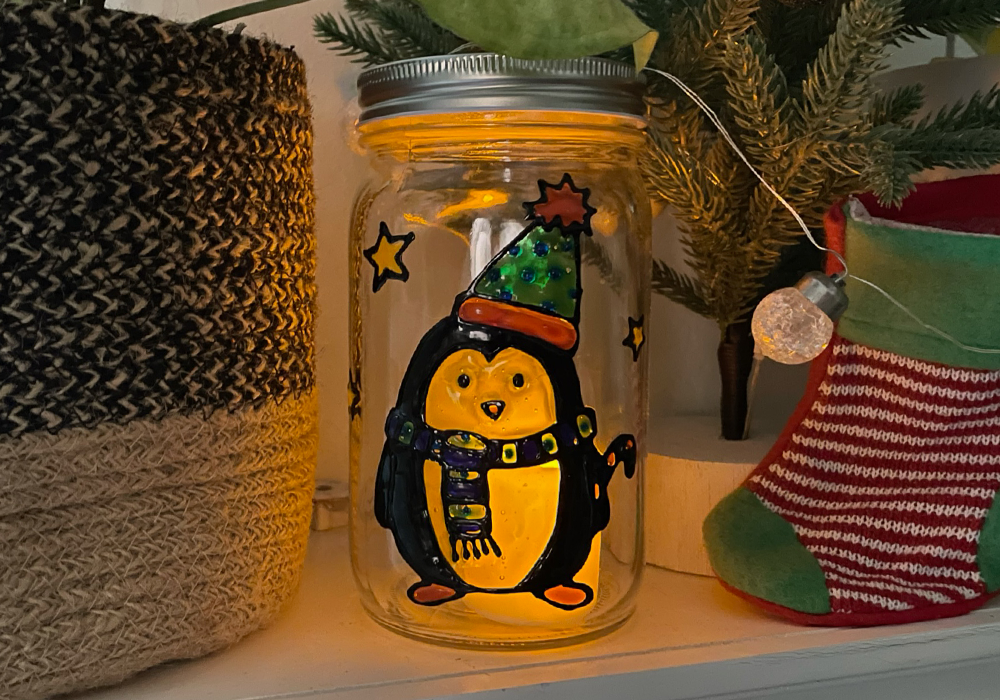
Step 5: After letting your masterpiece sit overnight, it's showtime for your holiday candle craft! Here's a little tip: you'll know the paint's ready when it goes from opaque to a lovely transparent one. Now, for the fun part - gently peel off your design and give it pride of place on the front of your jar. Your DIY holiday craft is coming to life!
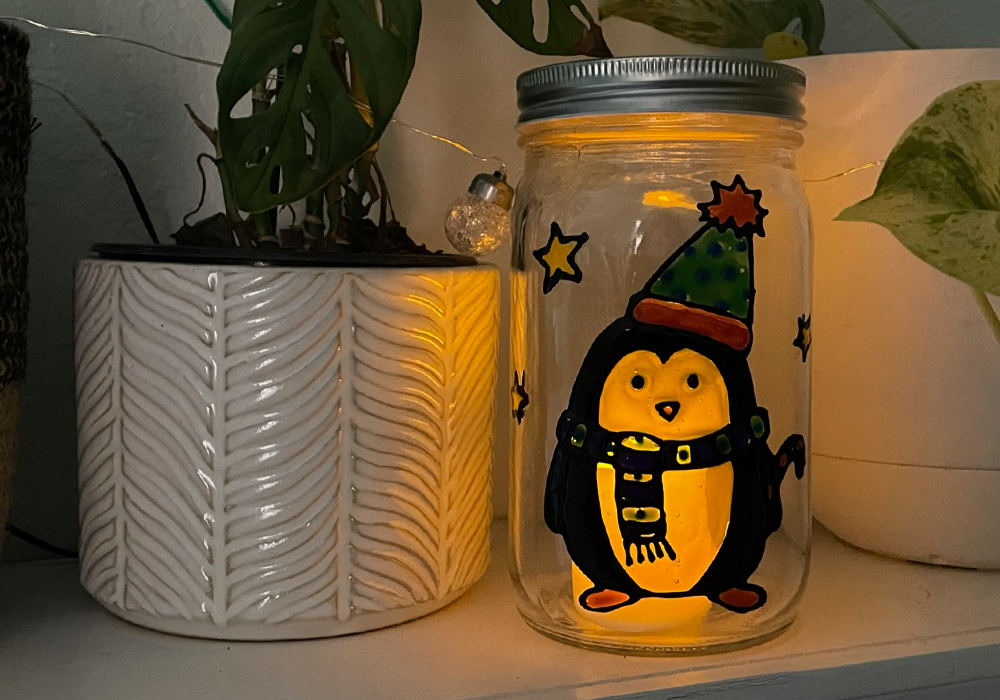
Step 6: Time to watch it glow! Turn on your flameless candle and put it into your mason jar. Watch as the light illuminates your handcrafted design. Voila! You've just crafted an enchanting DIY holiday candle holder that not only radiates warmth but also your personal touch. And here's the bow on the top: those transparent films aren't one-hit wonders! Reuse them to your heart's content and gift yourself and others with a parade of unique holiday candle holders throughout the season.
In the heart of winter, there's something truly magical about crafting warmth and memories with your own hands. Whether it's for your space or as a heartfelt gift, these DIY holiday candle holders are more than just decor — they're a testament to creativity and the joy of the festive season. Embrace the holiday spirit, keep crafting, and let your light shine brilliantly!
We would love to see photos of your craft projects! Tag us on Instagram at @WeAreOOLY using #OOLYcreateyourhappy.


