


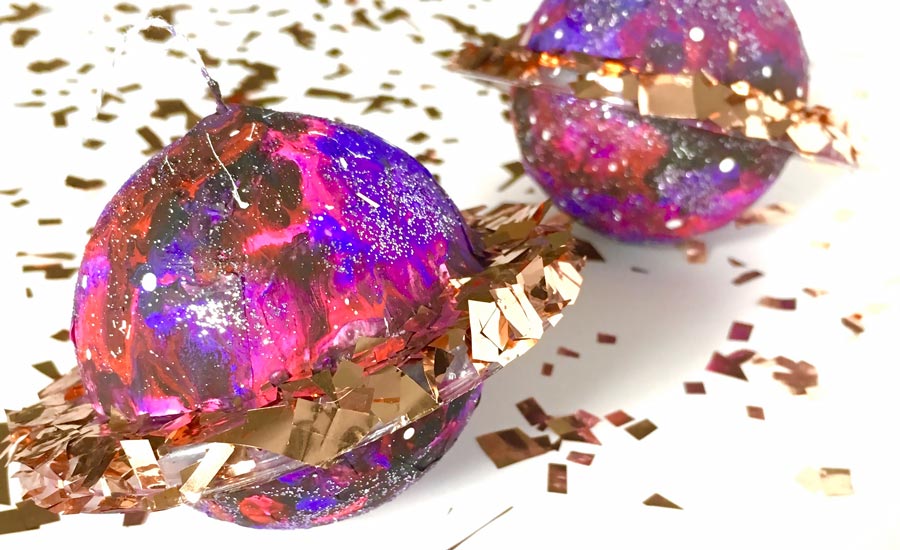
OOLY's Lil' Poster Paint Pods offer a fantastic palette of colors fit for a cosmic space theme! I loved the neon colors in this set, they've made it possible to create fantastical, "galactical" planets as a great paper mache project. These brightly colored planets would make great props for a school project, a space themed birthday party or just to hang in a child's bedroom! And the perfect accompaniment to the D.I.Y Alien and Spacecraft from my previous blog.
I happened to have the plastic packaging for bath bombs, and I immediately thought they looked like planets with rings. These plastic goodies were meant to be papier mâchéd for sure. If you can't find similar plastic packaging then you could use a styrofoam ball. I always try to use leftovers that I already have instead of buying new materials, this is a great way to reuse, up-cycle and spark new ideas.

The neon paint available in the OOLY Lil' Poster Paint Pods is great for making those atmospheric swirls of goodness on these planets and quite honestly it is what makes this project a shining star! The glitter paint also in this set adds that extra touch of space sparkle that makes them twinkle in the light.
Materials You Need for Your Planet Paper Mache Project:
- Round plastic packaging (bath bombs, pods water bottles, styrofoam ball)
- OOLY Lil' Poster Paint Pods
- Craft paint
- Foam brush
- Tacky glue
- Scrap paper/newspaper
- String
- Glitter
- Hot glue
- Old bristle brush
Step 1. Punch a small hole in the top of your ball and glue in a piece of string with hot glue. Or even use an elastic string to add some bouncy action when hung.
Step 2. Cut up small pieces of scrap paper or newspaper. I made 1"x 1" squares to use for the paper mâché.

Step 3. Mix some water and glue together in a small container and dip your paper into the mixture. Apply the paper mâché pieces to your planet being sure to overlap a little as you go along. Then allow it to dry well, approximately 1 day.

Step 4. Use a foam brush and dab on paint, try not to swipe, you want the colors to blend by coming into contact with each other without combining to make new colors. Choose whatever colors that suit your imagination.
Step 5. Once the paint is dry you can use glitter paint to embellish and add some sparkle and shine!
When finished hang your planets or display them with your D.I.Y. Alien and Space Ship.
Visit me on The Art Dream and see what else I'm up to!


