


Craft blog by: Emilee Peterman (@emilee.mitchel)
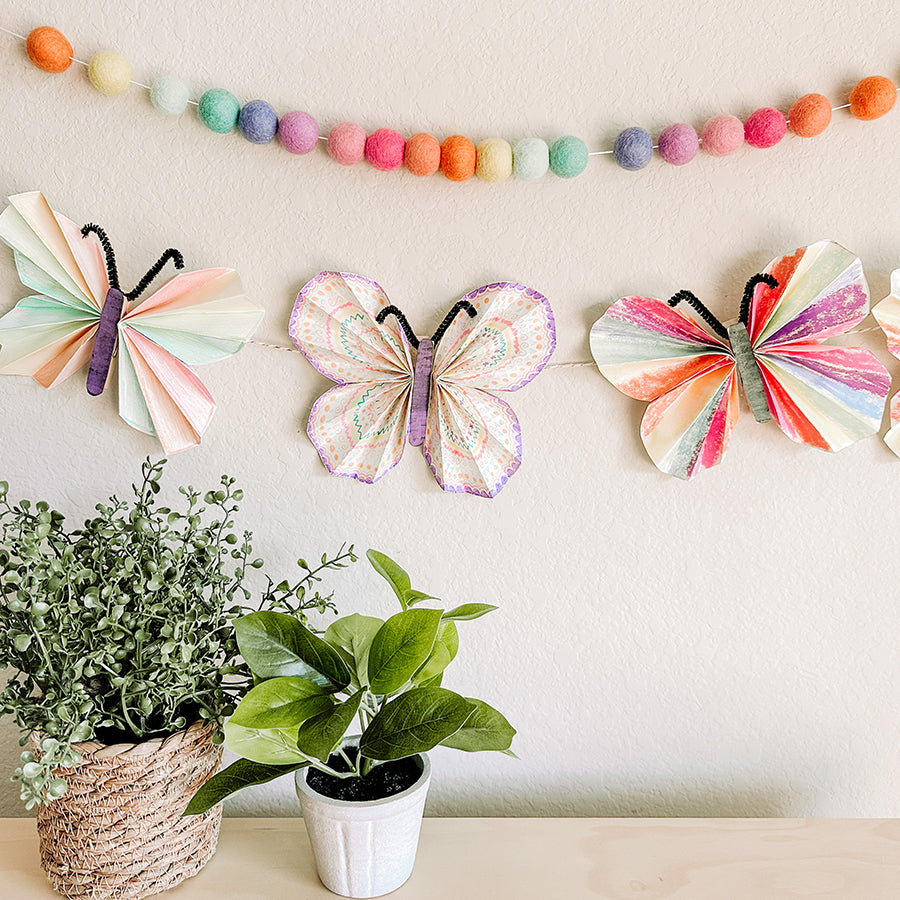
Spring brings me so much joy! The blooming flowers, the warming weather, and the emerging butterflies and baby animals, fill me to the brim with all the positive vibes. Spring is a great place to look when you need inspiration for easy crafts for kids, because they get just as excited for the changing seasons as we do. This simple butterfly craft is the springiest Spring DIY - celebrating the butterflies and pastel shades that have become synonymous with Spring. OOLY’s plethora of pastel goodies give artists tons of options to mix and match mediums for highly textured and totally unique butterflies. Whether your kiddos use them to decorate for Spring or to play with until the paper wears thin, you’ll love this fun DIY craft.
Time Duration: 30 minutes
Skill Level: Beginner
Other Items Needed:- Scissors (adult supervision required)
- Glue
- Clothespins
- Black pipe cleaners
Directions:

Step 1:
Cut two circles from OOLY’s White DIY Cover Sketchbook paper. These will become your butterfly wings!

Step 2:
Using an accordion fold, start at one end of one circle, fold over ½ inch of paper, press down.


Step 3:
Flip the circle over, folding another ½ inch of paper down on top of the first fold. Continue doing this until the entire circle is folded.


Step 4:
Once the accordion fold is complete, fold the entire thing in half. Now you have one wing ready for decorating!Step 5:
Repeat Steps 2-4 with the second circle to create the second wing.
Step 6:
Now it’s time to open up the circle and decorate the wings using OOLY’s favorite pastel products. The line from the fold can help guide how you decorate. Since I’m making a few different butterflies, I’m including a few different ideas for how to decorate.Step 6, Option 1:
Make a rainbow design using Chunkies Paint Sticks in pastel. Alternatively, let your creativity run wild by coloring both inside the folds or outside of the folds. You can also alternate colors if you wish. The possibilities are endless!


Step 6, Option 2:
Create a color block design using Pastel Hues Colored Pencils. Following along the grid made by the folds, you can color each block a different color.

Step 6, Option 3:
Using the Pastel Hues Dual Tip Markers and the Confetti Stamp Markers, get creative with fun designs. You can alternate patterns along each fold, or even use the stamp to create a border design along the outside edge of the circle. Pro tip: Mix up the mediums! My daughter loved using all of the above products to create her own, unique design.

Step 7:
Once your designs are completed, it’s time to fold the circles back up into their butterfly wing shape.
Step 8:
Add glue in the middle of each folded circle to keep the wing shape in place.
Step 9:
Now that the wings are complete, you can create the body. Start by folding a black pipe cleaner into a “V” so that it looks like an antenna, and hold it with the clothespin.
Step 10:
Glue the wings to each side of the clothespin. If you need to, have a grown-up use hot glue for a more secure attachment.
Step 11:
Now we’re going to add the body decoration. Trace the clothespin onto Black DIY Cover Sketchbook paper.
Step 12:
Color in your outline using Pastel Chunkies Paint Sticks.
Step 13:
Cut out the body, and glue it onto your clothespin. Voila - your butterfly is done! Making these paper butterflies is such a fun and easy way to let your imagination soar! My kids especially love to see how the designs they create on 2D paper, transform into intricate butterfly wing patterns. So whether you’re looking for a fun way to spend an afternoon or want to add some DIY decor to your room to celebrate Spring and add some positive vibes to your space, this easy art and craft is sure to send your creative spirit aflutter! We would love to see photos of your craft projects! Tag us on Instagram at @WeAreOOLY using #OOLYcreateyourhappy.


