


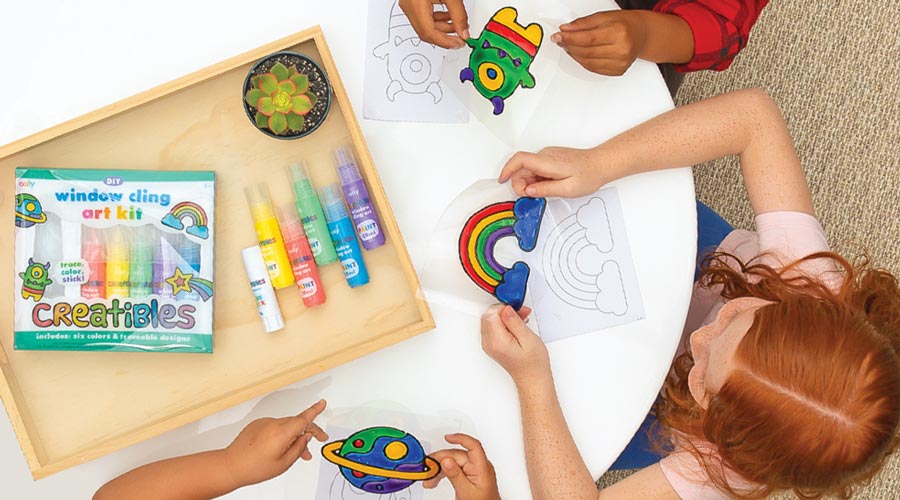
OOLY’s Creatibles DIY Window Cling Art Kit allows you to create a dazzling work of see-thru art to hang on your windows. They look just like stained glass art! These easy-to-follow DIY window cling art tips for young artists will help you start creating window cling art right away.
 Now with the black paint gel, outline your chosen design, you want to have a steady hand to create a thick and even outline. When finished with your outline let it dry for at least 2 hours before continuing.
 Once the 24 hours is up and your colored-in design is completely dry, carefully peel the artwork from the film. Your masterpiece is ready to be applied to a window, a mirror or other glass surface. Brighten up any window on a rainy day!
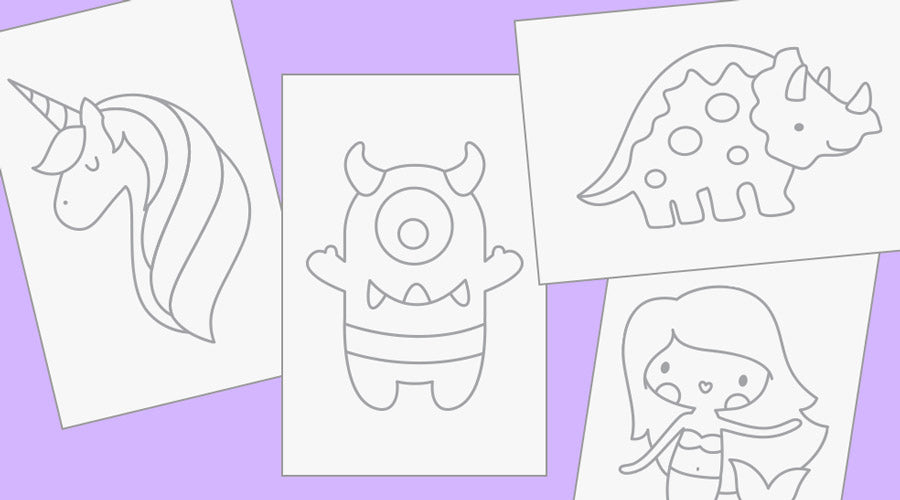
With 14 fun designs included in your Creatibles DIY Window Cling Art Kit, your windows can be a gallery of color. Don’t forget that OOLY has even more designs available online. Or create your own designs for your own unique artwork. DIY art kits for kids promote crafting and creative learning.
Once the 24 hours is up and your colored-in design is completely dry, carefully peel the artwork from the film. Your masterpiece is ready to be applied to a window, a mirror or other glass surface. Brighten up any window on a rainy day!
With 14 fun designs included in your Creatibles DIY Window Cling Art Kit, your windows can be a gallery of color. Don’t forget that OOLY has even more designs available online. Or create your own designs for your own unique artwork. DIY art kits for kids promote crafting and creative learning.
Make the Workspace Ready
Start with a clean work space, this is one of our top DIY window cling art tips, it's always a good idea when starting a new project. Before laying out your kit supplies; you may want to cover your workspace with paper or a plastic cloth. The Creatibles Window Cling Art Kit is for ages 6 plus and adult supervision is recommended. Of course you'll want to make one for yourself too! Pro DIY Window Cling Art Tip: If you think the project will not be completed in one sitting; either use a space won’t be disturbed or do the project on a tray, cardboard or something that can be moved without affecting the art and supplies. This project needs 24 hours to dry.
Layout the Supplies
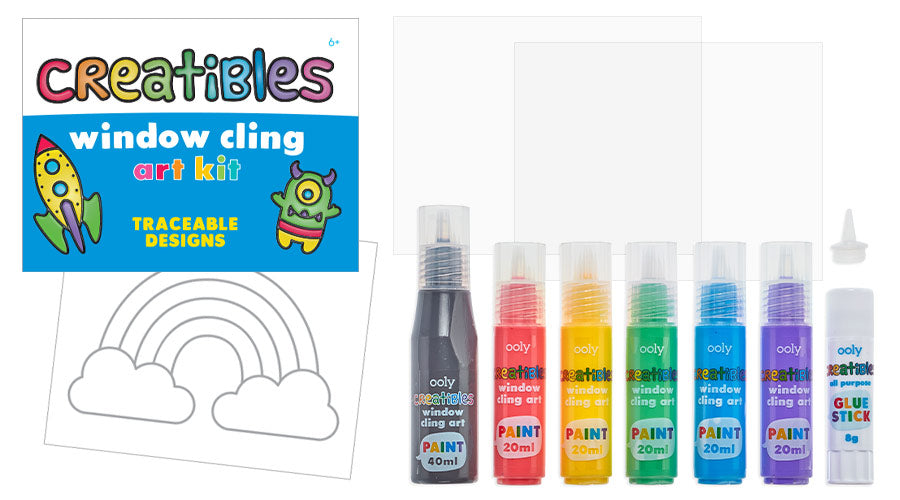
Getting your supplies laid out and ready to use will make the Window Cling kit more fun to use.Unpack The Creatibles DIY Window Cling Art Kit Supplies:
- 5 bottles of Brightly Colored Paint Gel
- 1 Bottle of Black paint Gel (a bigger bottle because this is used for your outlines)
- 2 Reusable Backing Films (you can use over & over again)
- 1 Glue Stick
- 1 Extra bottle tip
- 14 traceable design templates
Create A Dazzling Artwork
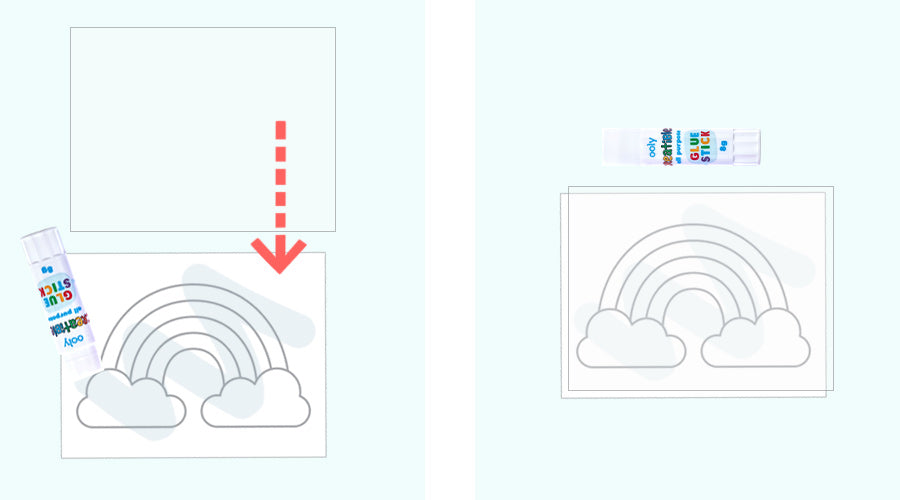
Let's go! Now that the workspace is ready begin by choosing your design from all the templates. Next apply a thin layer of glue with the glue stick on the design and place a film on it. The light coating of glue holds the film in place while you are working.
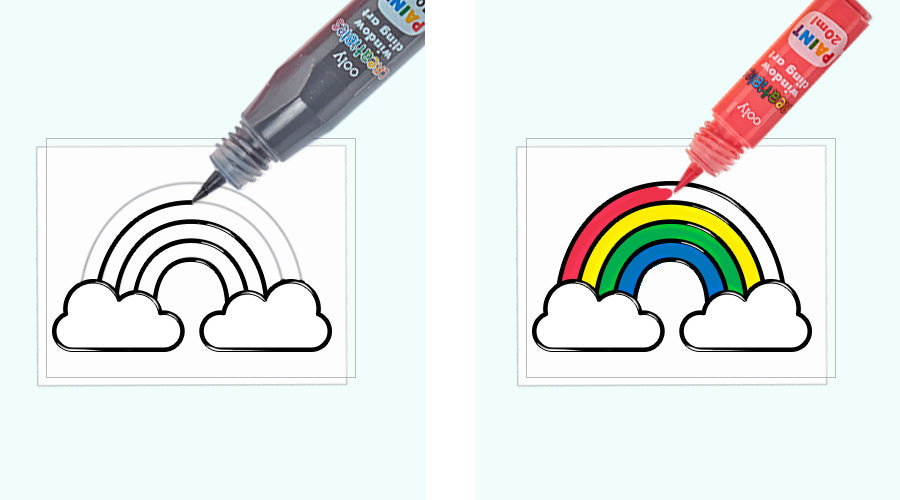
Now with the black paint gel, outline your chosen design, you want to have a steady hand to create a thick and even outline. When finished with your outline let it dry for at least 2 hours before continuing.
Once your black outline is completely dry, it's time to add the color!
Once your black outline is completely dry, it's time to add the color. Use the colored paint to apply a thick and even layer as you color and fill in your design. It is important to have a nice thick layer of colored paint to ensure a good window cling. Pro Tip: Make sure your colored paint gel touches the black outline gel when adding your colors. If you leave any gaps between the colors and the black outline it may come apart with you remove it from the film. Once you have filled in your design outline with the colored paint gel, let it dry for 24 hours!
Once the 24 hours is up and your colored-in design is completely dry, carefully peel the artwork from the film. Your masterpiece is ready to be applied to a window, a mirror or other glass surface. Brighten up any window on a rainy day!
With 14 fun designs included in your Creatibles DIY Window Cling Art Kit, your windows can be a gallery of color. Don’t forget that OOLY has even more designs available online. Or create your own designs for your own unique artwork. DIY art kits for kids promote crafting and creative learning.


